Observation of Interaction – MetroCard Vending Machine (10/21/2009)

Observation 1 – Conducting research in a public place in New York City is not as easy as it use to be. Now that Big Brother is watching for terrorist threats, any time you hang out in one area, you are immediately suspicious. I knew that I wanted to watch people interact with MetroCard Vending Machines in the Subway, but finding my research spot proved to be difficult. The first spot I selected, the Broadway Lafayette station, had three police officers with a searching table set up next to the vending machine, so I got back on the subway. Next I went to Prince Street, but at that station there were Armed Guards changing the money in the vending machine, so I didn’t think they would want me hanging around either. Finally I ended up in a good spot at 14th Street Union Square.
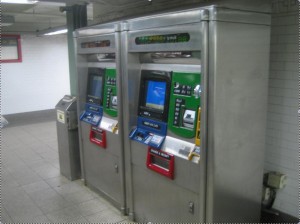
mta1

Observation 2 – Staking out my spot at the tail end of the rush hour commute, I imagined that the flow of people would be moderate, but not overwhelming. It turned out that very few people needed to use the vending machine, as they already had a positive balance on their MetroCard. It is interesting to note that there are many chances to use something like an ATM, Vending Machine of Food, and other similar interfaces, most people seem to use the MetroCard machine infrequently.

Observation 3 – Users of the machine looked visibly confused and/or frustrated. Navigating the many choices seemed okay, but when it came time to pay, inserting cash and getting a credit card to swipe and be approved seemed to really slow things down. One person completed the transaction in 30 seconds, but most took 40 seconds to 60 seconds to get their card and be on their way.
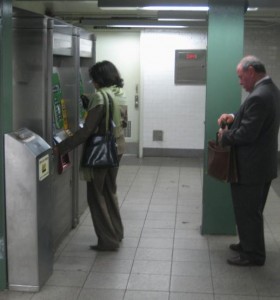
mta2

Observation 4 – Most people inserted their current MetroCard to add money, which implies that they were existing users of this system and not first-time users. Despite their prior use, they seemed equally frustrated, delayed, and unsure of what to do. Again, the payment part of the process seemed to be the bottleneck.
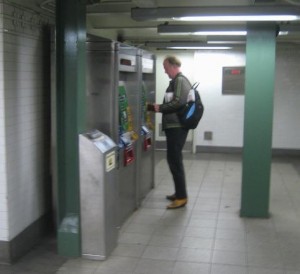
mta3

Observation 5 – Although there were two machines next to each other, frequently there would be several people waiting to use one machine, while the other was left free. And several people canceled their transaction midway only to move to the adjacent machine to try again.

Observation 6 – Before MetroCard Vending Machines existed, the only way to buy a metrocard (or token) was to visit the ticket booths with ticket agents. My guess was that the vending machines were put into place to automate this process, saving the city money by having less wage workers on the clock and saving the end user time by reducing transaction time and line waiting. Assuming these were the goals, this has not been a successful change of service and behavior. Many users first went to the ticket booth, only to find that they had to use the vending machine. Other users started off at the vending machines, but then went to ticket booth for help, only to return to the vending machine. Clearly the machines are not easy to use and the ticket agents have been recast as technical troubleshooters, possibly a function they have not been trained in or that they do not want to perform.

In this video, you can watch as one women has an awful time getting her MetroCard, only to then seek help from the ticket agent, and finally to give up and leave empty handed.

MetroCard Vending Machine – Reserach and Observation from Noah King on Vimeo.
Processing / Arduino Serial Communication Test (10/20/2009)

Processing / Arduino Serial Communication Test from Noah King on Vimeo.

This simple test was for a Physical Computing Lab project to create serial communication between Arduino and Processing. After numerous errors, I discovered that I needed to upgrade to Processing 1.08 and then proceeded without any trouble. I chose to use a Sonar Range Finder as my sensor input, controlling the movement of a ball on the screen.

Arduino WAV Shield Test (10/20/2009)

WAV Shield Test from Noah King on Vimeo.

I ordered an Arduino WAVE shield kit that finally arrived in the mail. After several hours of soldering, the kit was assembled and I managed to get a Clipse song to playback through a small, low-power speaker. Now I’m ready to make my own personal audio player, though it may be the size of a lunch box. Not exactly an iPod killer.

Musical Instrument – Sonar Range Interface – Test 1 (10/05/2009)

Instrument Test 1 from Noah King on Vimeo.

After installing a sound library on the Arduino, I have begun to conceive musical instruments with body-gesture inputs. This simple test was to create a Theramin-like instrument that plays different notes based on the distance between your hand and the device.

Robotic Drummer / Pet Trick Project – Second Test (9/30/2009)

Robotic Drummer – Solidworks design workflow from Noah King on Vimeo.

The second attempt at the Robotic Drummer project began on the computer in Solidworks. First I built a library of common parts, like the servos and switches, and then I designed a way to efficiently get the parts to assemble together. This helped work around some of the construction problems I had run into the week before, and also took out a lot of the guess work of getting parts to combine together in a strong and light-weight configuration. Once the CAD version was complete, I used it to make measurements off of, which lead to a problem-free day of fabricating the physical model.

Robotic Drummer – 4 servo configuration, pre-test setup from Noah King on Vimeo.

Working off of the CAD data, I built the pot-switch controller box and daisy-chained together the servo motors into the two arm setup. There was a lot of wiring and assembling to do, so I shot this video after finishing the setup of the parts and before official sending code to the arduino and seeing if anything worked.

Robotic Drummer – 4 servo test from Noah King on Vimeo.

Last week I assembled some code to get the 2 servos to move and be controlled by the POT switches. In this test, I expanded the code to work with four motors and four switches. After sending it to the Arduino, the robot worked fine, except for some loose connections between the board and the motors. I plan to solder these terminals so that they are not so loose. Additionally, solenoid actuators need to be added to the end of the arms so that a drum stick can get fired down towards a drum surface.

Fantasy Project – Robotic Drummer (9/23/2009)

One group of musicians and music producers I have a great respect and appreciation for is The Neptunes, aka Pharell Williams and Chad Hugo.  From what I’ve read, they have an unorthodox process for making music.  They develop their songs using live instruments, but then record and master their songs using entirely digital, synthesized sound.  This gives them the crisp, perfect sounds they are famous for.  However, I find this process to be counter intuitive, especially as someone who is not formally trained to play live instruments.

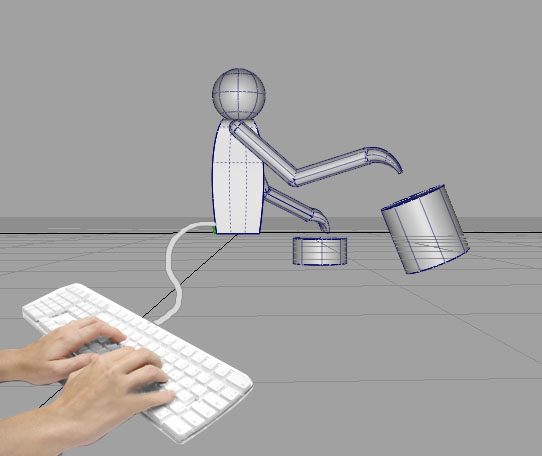
My idea for the Fantasy Project is to create a Robotic Drummer who takes an input stream of notes / sounds and plays them on a real drum set.  In essence, this is the opposite of what the Neptunes do, and I suspect that it would make the experience of recording music with live instruments more accessible to people, like myself, who do not possess such skills.

Watching a human play the drums can be quite amazing.  In the below video, an experienced drummer wows the viewer.

Reggae/DNB from Xtruist Art on Vimeo.

In this video, a human drummer dsiplays his sense of rhythm, technical precision, and stylized playing. Much of this is possible because of the complex movements of the human arm and because of the sophistication of the human brain. My design is to take the thinking from our brains and supplement it with the dexterity and precision of Robotic arms.

Robotic Drummer – Motion Study from Noah King on Vimeo.

A human arm is quite complex in the way that it moves. This movement can be simulated using a robotic arm in three sections. Using 7 servos for 7 axes of movement, a full range of motion would be achievable.

concept_sketch

This design could either work in real-time with a keyboard with each key mapped to each drum strike, or the device could have a pre-recorded drum sequence programmed into it and then it could play back the sounds.

Robot Drummer Concept Development (9/23/2009)

Double Arm Robot Drummer – Test 1 from Noah King on Vimeo.

I devised a simpler design to continue exploring the use of servos with robotic arms.

This design has two separate arms, each one pivoting with the intent of striking another object, making a drum sound.

This initial test was to directly control the position of the arm with the position of the potentiometer. It was successful, but would make playing successive drum beats both tedious and difficult.

Double Arm Robot Drummer – Test 2 from Noah King on Vimeo.

This second test explored a looped movement, independent of an analog control dial.

Both arms successfully looped their movement back and forth. You can see the metal cup and glass bottle in near-striking range, ready to make two unique drum sounds.

Double Arm Robot Drummer – Test 3 from Noah King on Vimeo.

This final test was largely successful, but it also identified a limitation of programming with a “for” loop.

In this setup, each arm is controlled by an analog dial, where programmatically the speed of the arm increases as the dial position increases.

In the end, this only made for two different arm velocities, but not two different rhythmic paces. Because both actions were programmed into the same “for” loop, the faster of the two arms must wait until the slower arm finishes moving, before looping into a second movement.

Although enormous progress was made on this project, a different programming strategy will be needed to get the result I want.

Robotic Arm Arduino Project Tests (9/23/2009)

Robotic Arm – Test 1 from Noah King on Vimeo.

After facing enormous challenges with the DC motors, I thought I would give the servos a try. To do so, I constructed a simple robotic arm with three sections and two joints. The whole construction was cobbled together and fairly rickety, which lead to some weight and balance issues.

But the servos did work, and I liked the use of the analog dials to control the movement.

Robotic Arm – Test 2 from Noah King on Vimeo.

In this test, the robotic arm waves nicely, but still the balance was a major issue. I tried to use counter weights to keep the arm’s lower limb from bending over, but then the whole construction became too heavy and the servo was no longer powerful enough to move the second joint.

This lead to the decision to build a simpler set of arms for the next test.

DIY remote control car test (9/23/2009)

Motorized Car – Test 1 from Noah King on Vimeo.

I played with remote control cars quite a bit when I was a boy, so some part of me desperately wants to be able to make my own R/C vehicle.

This first test was one of many where I ran into gearing problems. Without enough torque at the wheels, not much happens.

Motorized Car – Test 2 from Noah King on Vimeo.

In this test, I at least got one of the wheels to spin, but still there was a problem with torque and general loss of power through the gearing and mechanical construction. I want to try using real gears, rather than rubber bands, as I think it will translate the power more effectively.

Motorized Car – Test 3 from Noah King on Vimeo.

After constructing a cute little tri-cycled body, I reworked the gearing in this test. Although both wheels did spin, as soon as they were placed on a surface, the friction was too great and no movement occurred.

This was the lest of the car tests. I need to find a good gearing solution before proceeding.

Arduino Lab – Analog Input (9/23/2009)

Analog Sensor – LED test from Noah King on Vimeo.

This was a basic test to get an analog sensor, in this case a potentiometer, to control the brightness of an LED, much like a dimmer switch.